Case Management Guide for Helpline Operators
Complete guide to creating, documenting, and managing cases from first contact through resolution.
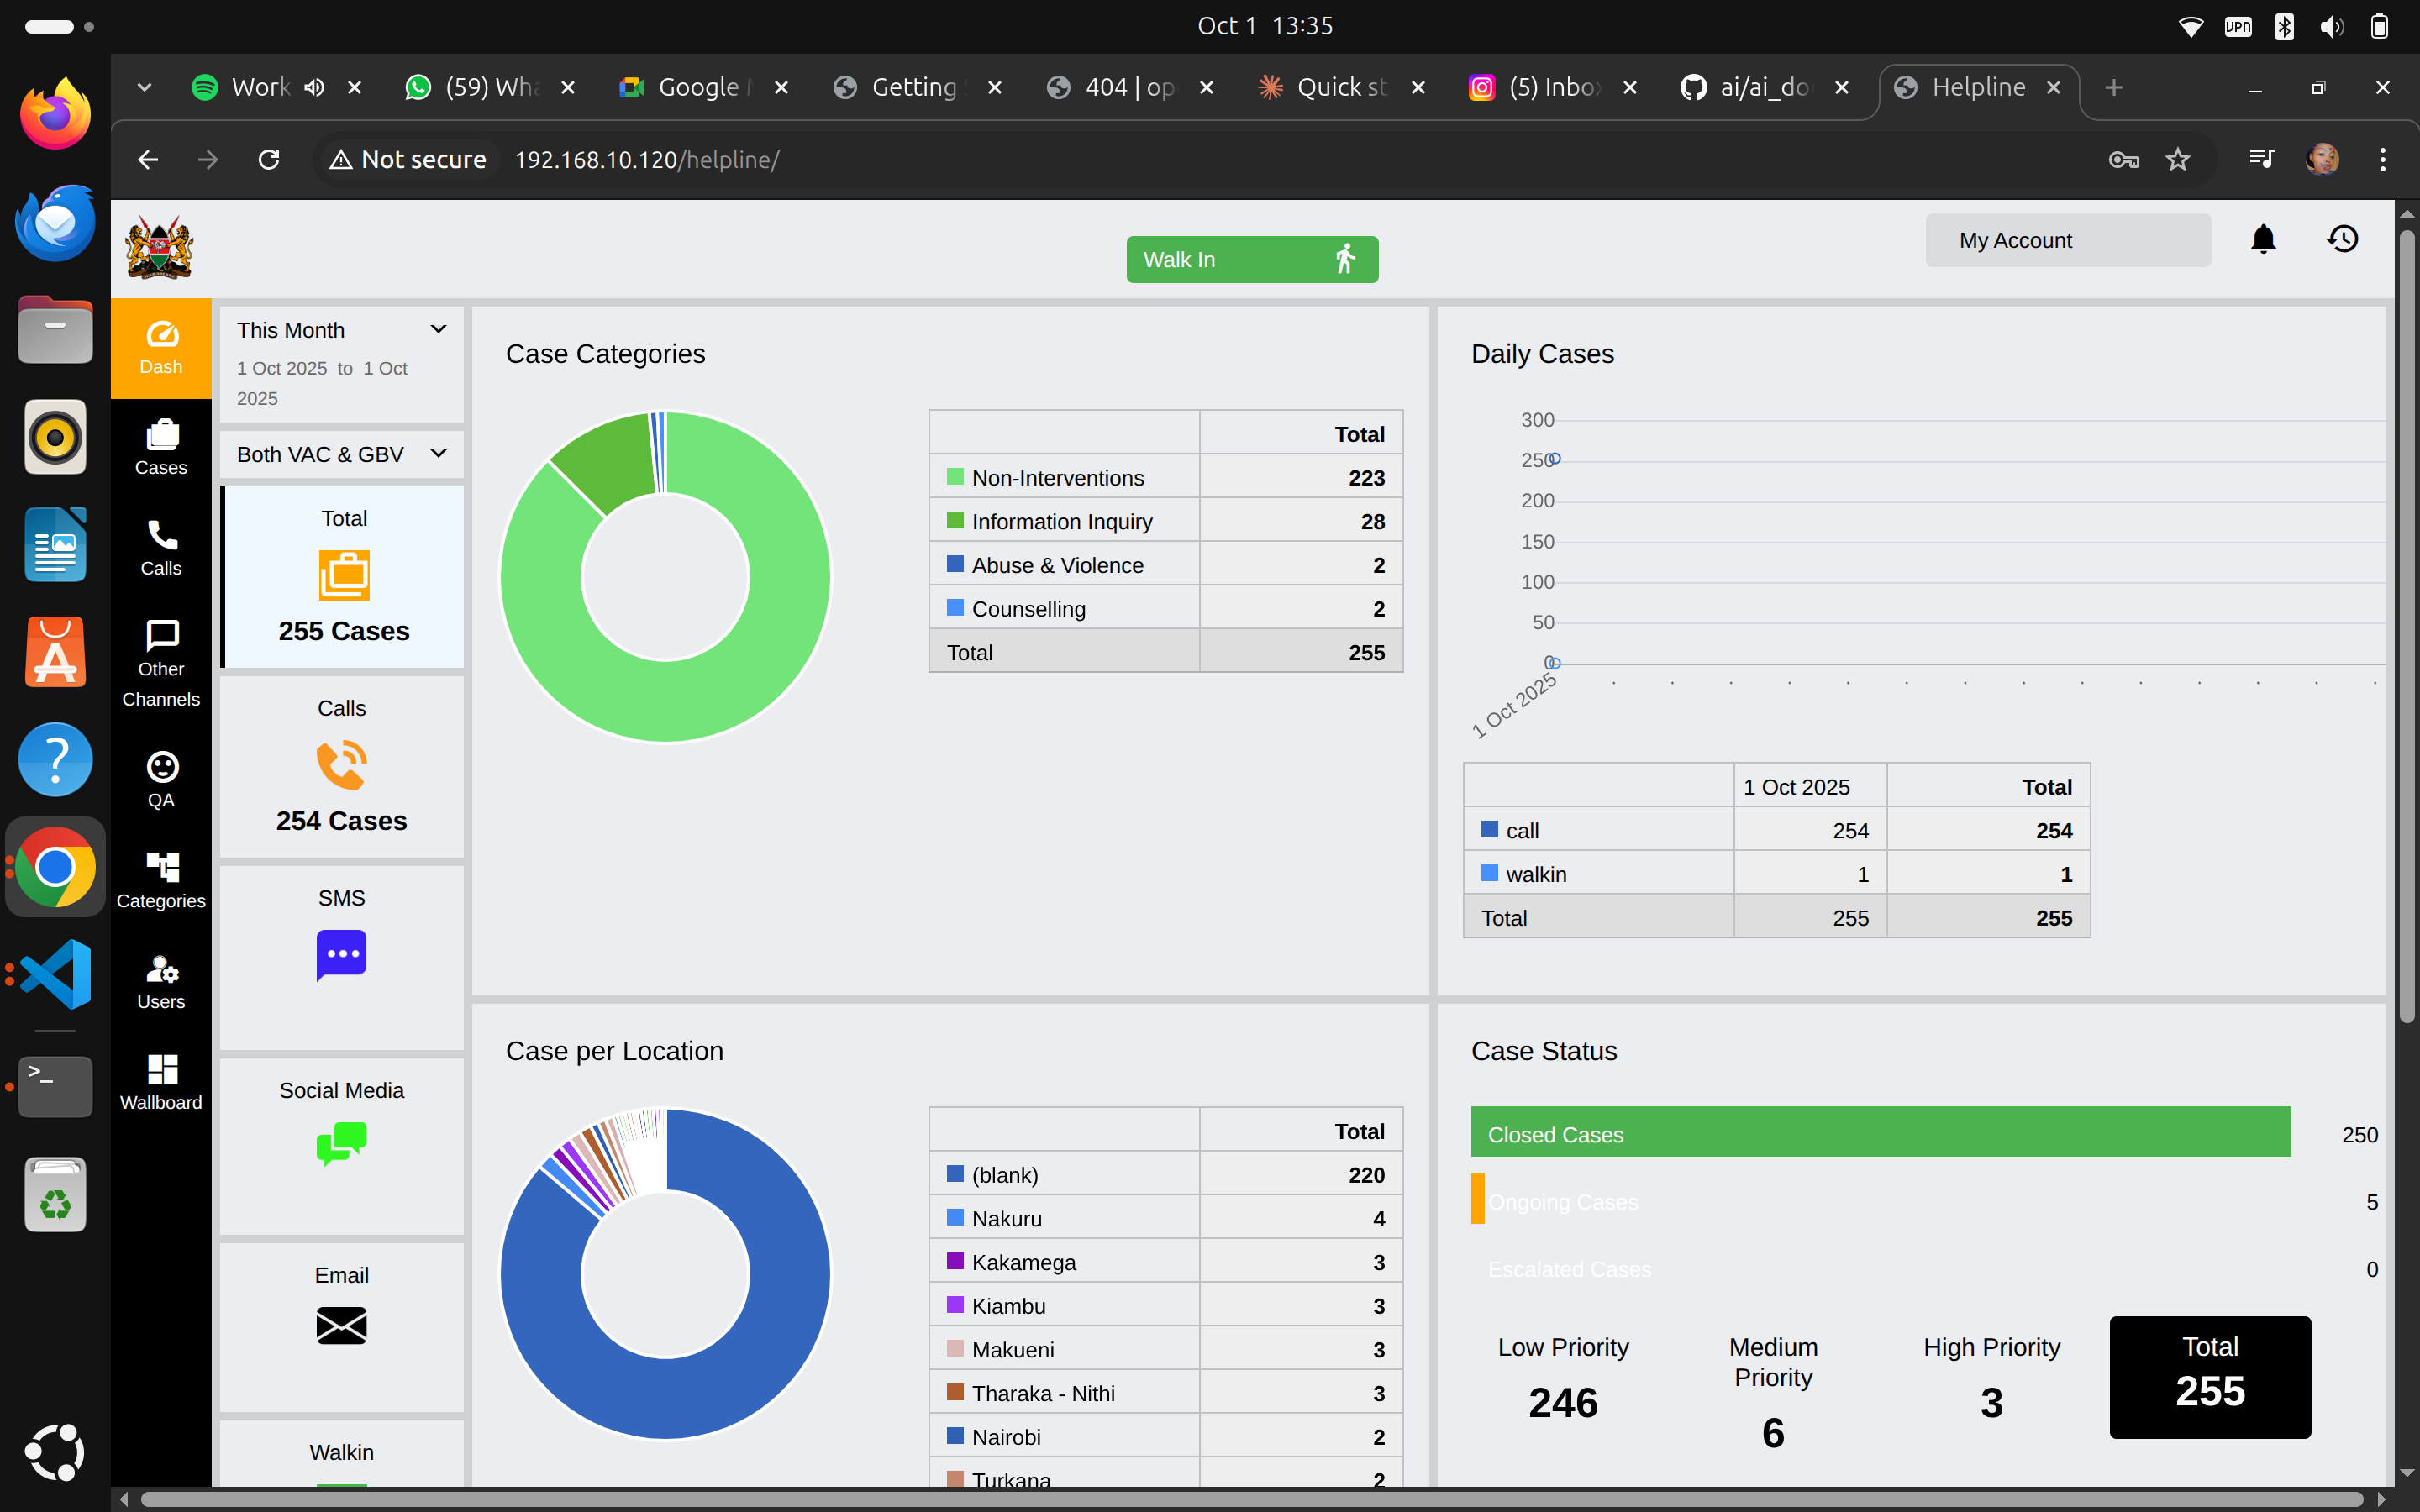
Understanding Cases
What is a Case?
A case is an official record of any incident or interaction that requires intervention, follow-up, or documentation beyond a simple information inquiry.
Case Components:
- Reporter: Person reporting the issue
- Client(s): Child or person receiving help
- Perpetrator(s): Person causing harm (if applicable)
- Case Details: Narrative, category, priority
- Activities: All actions taken on the case
- Files: Supporting documents or evidence
When to Create a Case
✅ Create a Case For:
- Child protection concerns
- Abuse or violence (physical, sexual, emotional)
- Neglect situations
- Mental health crises
- Situations requiring follow-up
- Referrals to other services
- Any VAC (Violence Against Children) or GBV (Gender-Based Violence)
❌ Don't Create a Case For:
- General information requests
- Wrong numbers
- Prank calls
- Simple directory assistance
Rule of Thumb: When in doubt, create the case. It's better to document than miss something important.
Creating a Walk-In Case
Step 1: Register the Walk-In
- Click "Walk In" button (green, top right of screen)
- Navigate to "Activities" tab
- Click "New Reporter"
Step 2: Enter Reporter Information
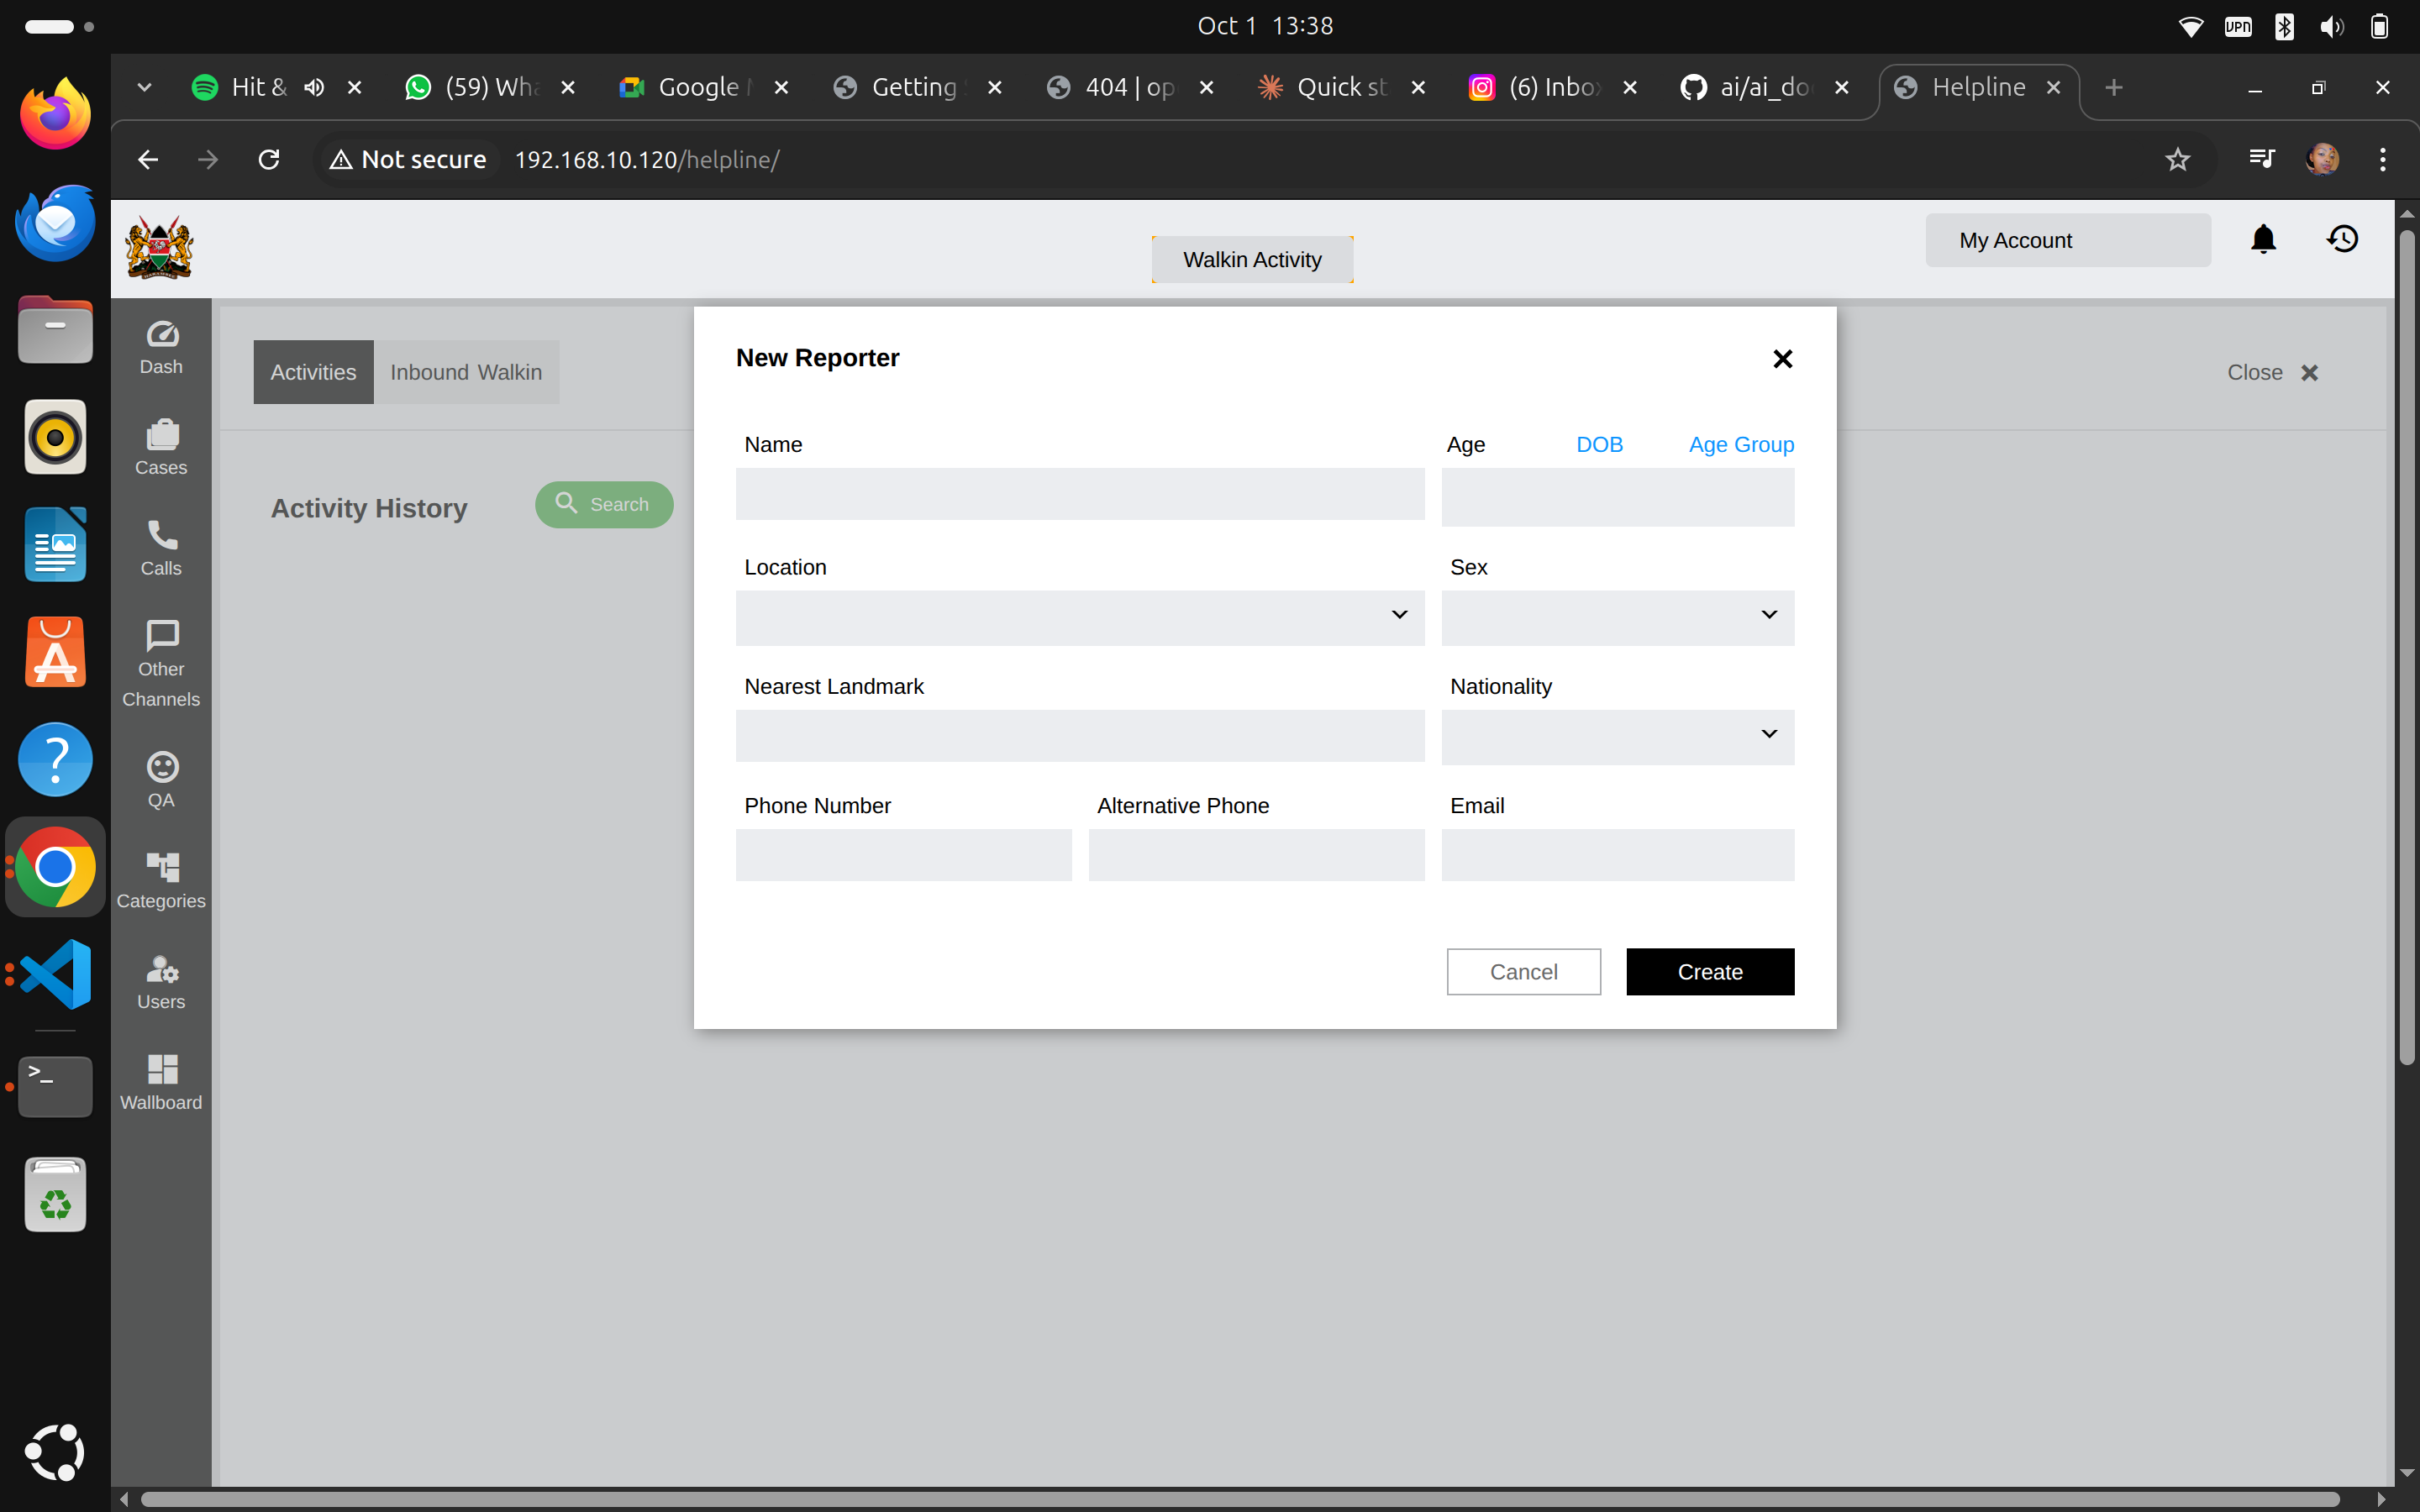
Required Fields (marked with *):
- Name: Full name of person reporting
- Age or Date of Birth or Age Group: Their age information
- Location: Where they're from (dropdown)
- Sex: Male/Female (dropdown)
Optional but Recommended:
- Nearest Landmark: Helps locate them
- Nationality: Country of origin
- Phone Number: Primary contact
- Alternative Phone: Backup contact
- Email: If they have one
Tips:
- Use clear, correct spelling for names
- Double-check phone numbers
- Ask for landmark details - helps follow-up
Click "Create" when complete.
Step 3: Create the Case
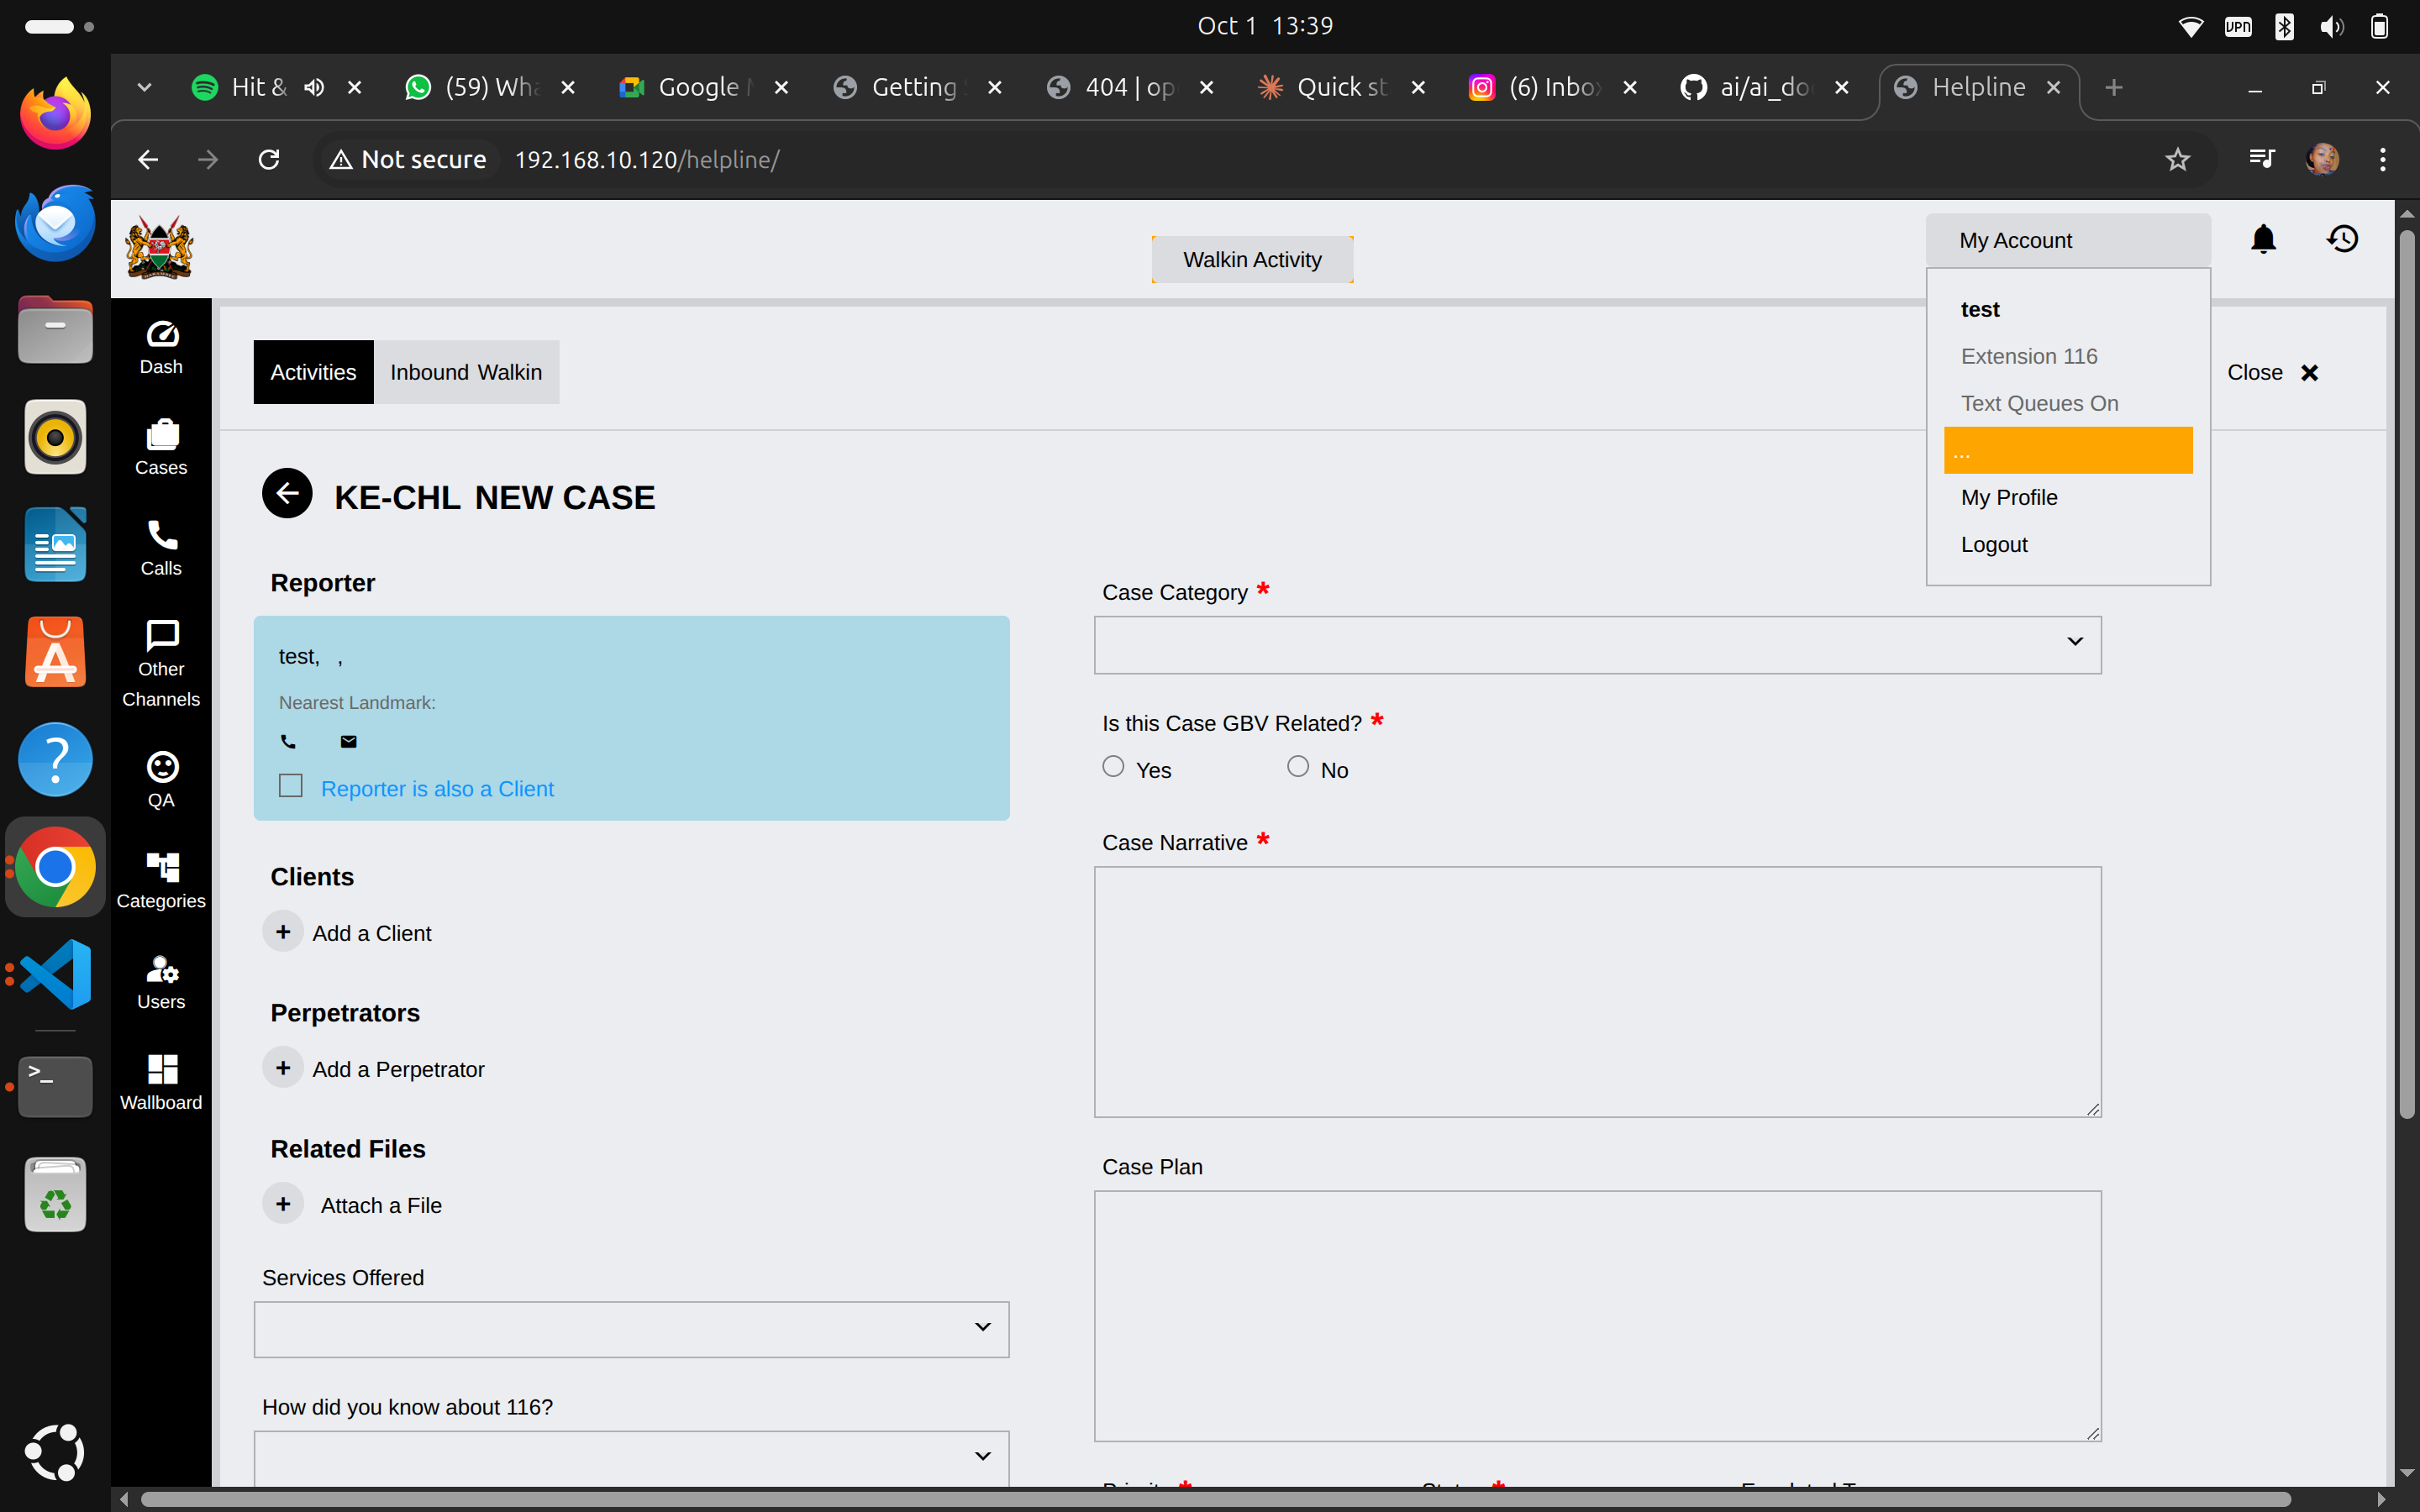
After creating reporter, system shows case form:
Reporter Section:
- ✅ Check "Reporter is also a Client" if the person reporting is the victim/client themselves
- Otherwise, you'll add client separately
Required Case Information:
Case Category* (dropdown)
- Non-Interventions
- Information Inquiry
- Abuse & Violence
- Counselling
- Mental Health
- (Other categories based on your helpline's setup)
Is this Case GBV Related?* (radio buttons)
- Yes / No
- GBV = Gender-Based Violence
Case Narrative* (text area)
- Write detailed description of the situation
- Include: What happened, when, who's involved, current status
- Be objective - record facts, not opinions
- Include caller's own words when important
Case Plan (text area)
- What actions will be taken
- Referrals needed
- Follow-up schedule
- Expected outcomes
Step 4: Add Client Information
If reporter is NOT the client:
- Click "Add a Client"
- Fill in client details:
- Name
- Age
- Sex
- Location
- Contact information (if available)
- Relationship to reporter
For Child Protection Cases: Always add the child as a client, even if parent is reporting.
Step 5: Add Perpetrator (If Applicable)
If there's an identified perpetrator:
- Click "Add a Perpetrator"
- Fill in available information:
- Name (if known)
- Relationship to client
- Any identifying details
- Location
Safety Note: Only record information you have. Never guess or make assumptions.
Step 6: Attach Files
If you have supporting documents:
- Click "Attach a File"
- Choose file from your computer
- Upload (photos, documents, reports, etc.)
Privacy: Ensure all files are properly secured and only contain necessary information.
Step 7: Complete Additional Sections
Services Offered (dropdown):
- Select what services you're providing or referring
- Can select multiple
How did you know about 116? (dropdown):
- Track how clients learn about helpline
- Helps with outreach planning
Step 8: Save the Case
- Review all required fields (marked with *)
- Check information for accuracy
- Click "Save" or "Submit" (bottom of form)
- Note your Case ID number
Case ID: Every case gets a unique ID (e.g., "KE-CHL-2025-001234"). Write this down - you'll need it for follow-ups.
Creating a Phone Call Case
During or After the Call
If call needs a case:
Click "New Case" button
System auto-populates:
- Source: "call"
- Source UID: Call identifier
- Reporter phone number
- Date/time
Complete remaining information (same as walk-in steps above)
Advantage: Phone cases automatically link to call records, making tracking easier.
Managing Existing Cases
Finding a Case
Method 1: Cases List
- Click "Cases" in sidebar
- Browse the list
- Click on any case to open it
Method 2: Search
- Click "Cases" in sidebar
- Click "Search" button
- Enter: Case ID, name, phone number, or date
- Click search result to open
Viewing Case Details
When you open a case, you see:
Header Information:
- Case ID and status
- Priority level
- Created date and by whom
Tabs:
- Case Details: Main information
- Activities: Timeline of all actions
- Files: Attached documents
- Related: Links to other cases
Adding Case Activities
Every action on a case should be logged:
To Add Activity:
- Open the case
- Click "Add Activity"
- Select activity type:
- Phone call made
- Home visit
- Referral sent
- Follow-up completed
- Meeting held
- Email sent
- Enter details and notes
- Save
Why This Matters: Complete activity history shows case progress and helps other operators if they take over.
Updating Case Information
To Update a Case:
- Open the case
- Click "Edit" (if available)
- Modify necessary fields
- Add update note explaining changes
- Save
Common Updates:
- Change priority level
- Update status (Open → Escalated → Closed)
- Add new information
- Update contact details
Case Priorities
Priority Levels
High Priority (3):
- Immediate danger
- Child at risk now
- Emergency intervention needed
- Response time: Same day
Medium Priority (2):
- Serious concern but not immediate danger
- Needs attention within 2-3 days
- Response time: 48-72 hours
Low Priority (1):
- Follow-up needed
- Non-urgent matters
- Information and referral
- Response time: Within a week
Setting Priority
Consider:
- Severity of situation
- Immediacy of risk
- Age of child (younger = higher risk)
- Presence of immediate threat
- Support systems available
Can Change: Priorities can be adjusted as situations evolve. Always update if circumstances change.
Case Status Types
Status Options
Open:
- Case is active
- Work in progress
- Needs follow-up
Escalated:
- Requires supervisor involvement
- More complex intervention needed
- Transferred to specialized team
Closed:
- Case resolved
- No further action needed
- Proper closure documented
Closing a Case
Before Closing, Ensure:
- ✅ All planned activities completed
- ✅ Client situation resolved or stabilized
- ✅ Referrals made and confirmed
- ✅ Follow-up completed
- ✅ All documentation complete
To Close a Case:
- Open the case
- Change status to "Closed"
- Select closure reason:
- Successfully resolved
- Referred to another service
- Client no longer needs help
- Unable to contact client
- Write closure summary
- Save
Closure Summary Should Include:
- Final outcome
- Actions taken
- Referrals made
- Client's current status
- Any recommendations
Documentation Best Practices
Writing Case Narratives
Good Example:
"Mother reports 12-year-old daughter Maria has been withdrawn for 3 weeks. Maria stopped attending school on Sept 15. Mother states Maria cries frequently and refuses to talk about what's wrong. Family lives in Kibera. No known history of abuse. Mother requests counseling referral."
Poor Example:
"Mom called about sad kid. Needs help."
Key Principles:
- Be specific: Include names, ages, dates, locations
- Be objective: Record facts, not interpretations
- Be complete: Answer who, what, when, where, why
- Be professional: Use proper language, check spelling
- Be confidential: Only record relevant information
Using Proper Language
DO Use:
- "Client reports..."
- "Mother states..."
- "Child disclosed..."
- "Visible injuries observed..."
DON'T Use:
- "I think..."
- "Maybe..."
- "Probably..."
- Personal judgments
Protecting Privacy
Always:
- Use system's secure storage
- Only share with authorized personnel
- Redact unnecessary identifying details in reports
- Follow data protection policies
Never:
- Discuss cases outside work
- Share client information on personal devices
- Leave case files open on shared computers
- Email case details without encryption
Referrals and Follow-Ups
Making Referrals
When client needs external services:
Identify appropriate service:
- Police (criminal matters)
- Hospital (medical care)
- Mental health clinic
- Legal aid
- Shelter/safe house
Document referral in case:
- Where referred
- Contact person
- Date of referral
- Referral reason
Follow up:
- Confirm client received service
- Document outcome
- Adjust case plan if needed
Scheduling Follow-Ups
To Schedule:
- Open the case
- Click "Add Activity"
- Select "Follow-up" type
- Set date and time
- Add reminder note
- Save
System will alert you when follow-up is due.
Follow-Up Checklist:
- Has situation improved?
- Were referrals successful?
- Does client need additional support?
- Update case status
- Schedule next follow-up if needed
Working with Different Case Types
Abuse & Violence Cases
Extra Precautions:
- Document everything in detail
- Note exact words used
- Record visible injuries
- Assess immediate safety
- Follow mandatory reporting laws
- Contact supervisor if unsure
Mental Health Cases
Key Actions:
- Assess immediate risk (self-harm, suicide)
- Use mental health screening tools (if trained)
- Provide crisis counseling numbers
- Refer to psychiatric services
- Schedule quick follow-up (24-48 hours)
Information Inquiry
Quick Cases:
- May not need full case documentation
- Record as disposition instead
- Create case if follow-up needed
- Provide accurate information
- Note what information was given
Common Challenges
Challenge 1: Incomplete Information
Problem: Caller won't or can't provide full details
Solution:
- Record what you have
- Note what's missing
- Set follow-up to gather more information
- Use "Unknown" or "Not Disclosed" fields
- Don't make up information
Challenge 2: Multiple Issues in One Call
Problem: Caller reports several different problems
Solution:
- Prioritize by severity
- May need multiple cases
- Link related cases together
- Address immediate crisis first
- Schedule follow-ups for other issues
Challenge 3: Language Barriers
Problem: Can't understand caller
Solution:
- Use translation features
- Find colleague who speaks language
- Use simple words and gestures (walk-ins)
- Document language used
- Arrange interpreter for follow-up
Challenge 4: Emotional Callers
Problem: Caller too distressed to provide information
Solution:
- Allow time to calm down
- Focus on immediate safety first
- Get basic information only
- Schedule callback when caller is calmer
- Document emotional state
Quality Checklist
Before saving any case, verify:
- [ ] All required fields completed
- [ ] Names spelled correctly
- [ ] Contact information accurate
- [ ] Case narrative is clear and detailed
- [ ] Priority level appropriate
- [ ] Client information added (if applicable)
- [ ] Services offered selected
- [ ] Follow-up scheduled (if needed)
- [ ] All activities documented
- [ ] Files attached (if applicable)
Quick Reference - Case Creation Steps
| Step | Action | Time |
|---|---|---|
| 1 | Click "Walk In" or "New Case" | 5 sec |
| 2 | Create/Select Reporter | 1-2 min |
| 3 | Enter case details | 3-5 min |
| 4 | Add clients/perpetrators | 2-3 min |
| 5 | Attach files (if needed) | 1 min |
| 6 | Complete additional sections | 1-2 min |
| 7 | Review and save | 30 sec |
| Total | 8-15 minutes per case |
Getting Help
If You Need Assistance:
- Supervisor: Complex cases, escalations
- Senior Operator: Quick questions
- IT Help Desk: System problems
- Training Materials: Review case management protocols
Emergency Cases: Always contact supervisor immediately for cases involving immediate danger.
Next Steps
- Daily Workflow Guide - Your daily routine
- Using AI Features - How AI helps with documentation
Remember: Good case documentation can be the difference between a child getting help or falling through the cracks. Take your time and be thorough.